프로젝트 myBatis1 vs 프로젝트 myBatis2
프로젝트 myBatis1
- 이전 프로젝트는 DAO 클래스에서 configuration.xml(MyBatis 환경설정 파일) 을 읽어와서 그걸로 SqlSessionFactory 객체를 생성
- 이전 프로젝트는 MyBatis 쪽에서 DB 연동을 처리하므로 SqlSession 객체를 @Autowired 로 생성하지 않음
- 이전 프로젝트 myBatis1 프로젝트에서는 Mode 1 - MyBatis , Mode 2 - MyBatis 연동할때와 똑같이 연동한다
프로젝트 myBatis2
- 현재 프로젝트는 DAO 클래스에서 @Autowired 로 SqlSession 을 주입할 것
- DB연동을 위해서 MyBatis 환경설정 파일들 대신 root-context.xml 에서 DB 접속에 대한 내용을 처리
- 내용은 프로젝트 myBaits1 과 연결된 내용
- 현재 프로젝트 myBatis2 프로젝트에서는 DB 연동 관련 내용을 Spring에서 제어, Spring 에서 DB 연동할 것
MyBatis 연동해서 Oracle DB 연동
Spring - MyBatis 연동 예제 2
프로젝트 myBatis2
실습 준비
- 먼저 오라클의 scott 계정이 활성화 되어있어야한다
- scott 계정 소유 테이블을 사용하므로 따로 테이블을 만들지는 않음
- 다음으로 클라우드의 프로젝트 import 하기


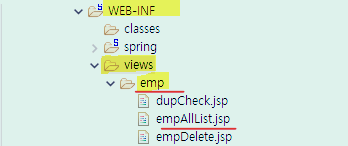
프로젝트 구조
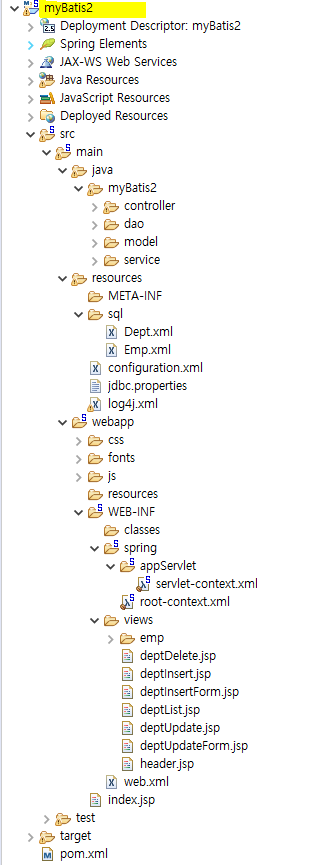
- DB 연동에 필요한 MyBatis 환경설정 파일들은 있지만 안에 내용이 없음
- 인터페이스와 구현클래스가 1쌍씩 만들어져 있다 ex) Service 인터페이스, Service 구현클래스
- 테이블이 2개이므로 Controller, DAO, Service 가 2개씩 만들어져있다
테이블이 늘어나면
1. Controller 클래스가 늘어남
2. DAO 클래스도 늘어남
3. Service 클래스도 늘어남
4. Mapper 파일도 늘어남
- 여기서 테이블을 Dept, Emp 둘 다 사용하므로 Dept 클래스들이 따로, 따로 Emp 클래스들이 따로 만들어짐
파일들 살펴보기 : pom.xml
- pom.xml
Spring 버전
- pom.xml 을 보면 Spring 버전이 나타나있음

- Maven Repository 페이지에서 Spring 최신버전을 확인해 볼 수 있다
- 버전을 높이면 다시 최신버전을 로컬저장소로 다운받아서 사용한다
Connection Pool 을 쓰기 위한 라이브러리
		<!-- dbcp jdbc connection pool -->
		<dependency>
			<groupId>commons-dbcp</groupId>
			<artifactId>commons-dbcp</artifactId>
			<version>1.2.2</version>
		</dependency>
		<dependency>
			<groupId>c3p0</groupId>
			<artifactId>c3p0</artifactId>
			<version>0.9.1.2</version>
		</dependency>
- Connection Pool 을 쓰기 위한 commons-dbcp 라이브러리, c3p0 라이브러리가 추가되어있다
MyBatis 연동위한 라이브러리
		<!-- mybatis -->
		<dependency>
			<groupId>org.mybatis</groupId>
			<artifactId>mybatis</artifactId>
			<version>3.2.3</version>
		</dependency>
		<dependency>
			<groupId>org.mybatis</groupId>
			<artifactId>mybatis-spring</artifactId>
			<version>1.2.1</version>
		</dependency>
- Spring 에서 MyBatis 를 쓰려면 MyBatis 라이브러리 뿐 아니라 MyBatis-Spring 연결 라이브러리도 필요하다
파일들 살펴보기 : web.xml
- web.xml
<?xml version="1.0" encoding="UTF-8"?>
<web-app version="2.5" xmlns="http://java.sun.com/xml/ns/javaee"
	xmlns:xsi="http://www.w3.org/2001/XMLSchema-instance"
	xsi:schemaLocation="http://java.sun.com/xml/ns/javaee http://java.sun.com/xml/ns/javaee/web-app_2_5.xsd">
	<!-- 한글 입력 -->
	<filter>
		<filter-name>CharacterEncodingFilter</filter-name>
		<filter-class>org.springframework.web.filter.CharacterEncodingFilter</filter-class>
		<init-param>
			<param-name>encoding</param-name>
			<param-value>UTF-8</param-value>
		</init-param>
		<init-param>
			<param-name>forceEncoding</param-name>
			<param-value>true</param-value>
		</init-param>
	</filter>
	<filter-mapping>
		<filter-name>CharacterEncodingFilter</filter-name>
		<url-pattern>/*</url-pattern>
	</filter-mapping>
	<!-- The definition of the Root Spring Container shared by all Servlets and Filters -->
	<context-param>
		<param-name>contextConfigLocation</param-name>
		<param-value>/WEB-INF/spring/root-context.xml</param-value>
	</context-param>

	<!-- Creates the Spring Container shared by all Servlets and Filters -->
	<listener>
		<listener-class>org.springframework.web.context.ContextLoaderListener</listener-class>
	</listener>
	<!-- Processes application requests -->
	<servlet>
		<servlet-name>appServlet</servlet-name>
		<servlet-class>org.springframework.web.servlet.DispatcherServlet</servlet-class>
		<init-param>
			<param-name>contextConfigLocation</param-name>
			<param-value>/WEB-INF/spring/appServlet/servlet-context.xml</param-value>
		</init-param>
		<load-on-startup>1</load-on-startup>
	</servlet>
	<servlet-mapping>
		<servlet-name>appServlet</servlet-name>
		<url-pattern>*.do</url-pattern>
	</servlet-mapping>
</web-app>
- Apache Tomcat 이 실행시 자동으로 실행되는 파일
web.xml 에 들어가는 내용 3가지
1. Dispatcher Servlet 이름, 위치, 매핑 등록
- Dispatcher Servlet 클래스에 대한 위치가 등록되어있다
- Dispatcher Servlet 으로 찾아가기위한 매핑 등록
- 현재는 do 확장자로 요청할때만 Dispatcher Servlet 으로 찾아감
2. Spring 환경설정 파일 불러오기
- servlet-context.xml, root-context.xml 을 불러서 실행시켜준다
+ 두 파일이 resources 폴더 내에 있는 경우 classpath: 붙이기
3. 한글값 인코딩
- 한글값 인코딩시켜주는 필터와 필터매핑을 잡음
파일들 살펴보기 : servlet-context.xml
<?xml version="1.0" encoding="UTF-8"?>
<beans:beans xmlns="http://www.springframework.org/schema/mvc"
	xmlns:xsi="http://www.w3.org/2001/XMLSchema-instance"
	xmlns:beans="http://www.springframework.org/schema/beans"
	xmlns:context="http://www.springframework.org/schema/context"
	xsi:schemaLocation="http://www.springframework.org/schema/mvc http://www.springframework.org/schema/mvc/spring-mvc.xsd
		http://www.springframework.org/schema/beans http://www.springframework.org/schema/beans/spring-beans.xsd
		http://www.springframework.org/schema/context http://www.springframework.org/schema/context/spring-context.xsd">

	<!-- DispatcherServlet Context: defines this servlet's request-processing infrastructure -->
	<!-- Enables the Spring MVC @Controller programming model -->
	<annotation-driven />

	<!-- Handles HTTP GET requests for /resources/** by efficiently serving up static resources in the ${webappRoot}/resources directory -->
	<resources mapping="/resources/**" location="/resources/" />

	<!-- Resolves views selected for rendering by @Controllers to .jsp resources in the /WEB-INF/views directory -->
	<beans:bean class="org.springframework.web.servlet.view.InternalResourceViewResolver">
		<beans:property name="prefix" value="/WEB-INF/views/" />
		<beans:property name="suffix" value=".jsp" />
	</beans:bean>

	<context:component-scan base-package="myBatis2" />

</beans:beans>
<ViewResolver>
- View 파일들이 저장될 최상위 디렉트리를 지정하고 있다
- 현재는 "/WEB-INF/views" 가 View 파일들의 최상위 디렉토리이다
- 주의 : /WEB-INF/views 아래 어떤 폴더가 있고 그 안에 어떤 View 페이지가 있다면 Controller 에서 View 페이지로 찾아갈때 그 하위 폴더를 경로에 추가해야함
ex) 현재는 views 폴더 아래 emp 폴더가 있고 그 안에 일부 View 파일들이 있다, Controller 클래스에서 그 파일로 갈때는 return "emp/empList.jsp" 로 가야함
<base-package>
- base-package 를 지정한다는 의미는 어노테이션 기반을 사용하겠다는 의미
-base-package는 base 가 되는 자바파일들이 저장될 최상위 디렉토리를 지정하는 것이다, 이 패키지는 java 폴더 하위에 있어야한다
- 이 base-package 안에 클래스들이 있어야함, 그 클래스들 위에는 4가지 어노테이션 중 하나가 붙어있어야만 Service / Controller / DAO 기능 수행 가능
- base-package 는 기본적으로는 top-level 패키지 3단계로 만들어진다
- 여기선 수정해서 "myBatis2" 를 base-package 로 설정했다
- src/main/java 폴더 하위의 myBatis2 폴더 안의 클래스들을 모두 읽어온다는 의미
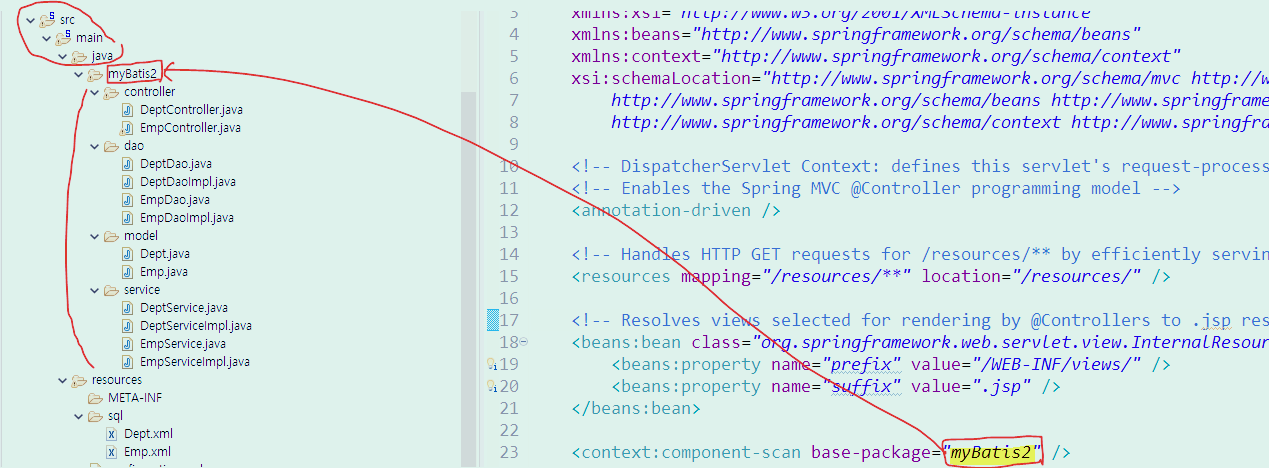
+ servlet-context.xml 에서는 Setter DI (ViewResolver) 도 쓰고 있고 어노테이션 기반 DI (base-package) 도 있다
+ 원래 Spring 프로젝트 생성시 지정했던 top-level 패키지명 보기
- pom.xml 부분

- com.ch.myBatis2 이었다
- 이 패키지를 지우고 myBatis2 만 남긴것
파일들 살펴보기 : MyBatis 환경설정 파일
1. jdbc.properties
2, configuration.xml
3. Mapper 파일 (테이블 마다)

파일들 살펴보기 : Configuration.xml
2, configuration.xml
<?xml version="1.0" encoding="UTF-8" ?>
<!DOCTYPE configuration PUBLIC "-//mybatis.org//DTD Config 3.0//EN"
"http://mybatis.org/dtd/mybatis-3-config.dtd">

<configuration>

	<typeAliases>
		<typeAlias alias="dept" type="myBatis2.model.Dept" />
		<typeAlias alias="emp"  type="myBatis2.model.Emp" />
	</typeAliases>

	<!--
	<mappers>
		<mapper resource="sql/Dept.xml" />
		<mapper resource="sql/Emp.xml" />
	</mappers>  -->

</configuration>
- configuration.xml 의 3가지 내용(DTO alias, DB접속 내용, Mapper 파일 호출) 중 DTO alias 설정하는 코드만 남아있다
- DTO alias 설정 내용만 있다
3. Mapper 파일 (테이블 마다)
- Dept.xml, Emp.xml 이 있다
- Mapper 파일들 안에 내용은 모두 그대로 이다
- Spring - MyBatis 연동하고 Spring 으로 DB 연동을 처리하더라도 Mapper 파일의 내용은 같다, 그대로 SQL문들이 있음
- Spring - MyBatis 연동할때 Mapper 파일일은 JSP - MyBatis 연동때 Mapper 파일과 똑같다
파일들 살펴보기 : root-context.xml
- root-context.xml
<?xml version="1.0" encoding="UTF-8"?>
<beans xmlns="http://www.springframework.org/schema/beans"
	xmlns:xsi="http://www.w3.org/2001/XMLSchema-instance"
	xmlns:context="http://www.springframework.org/schema/context"
	xsi:schemaLocation="http://www.springframework.org/schema/beans http://www.springframework.org/schema/beans/spring-beans.xsd
		http://www.springframework.org/schema/context http://www.springframework.org/schema/context/spring-context-4.1.xsd">

	<!-- <context:property-placeholder location="classpath:jdbc.properties" /> -->

	<!-- dataSource -->
	<!-- <bean id="dataSource" class="com.mchange.v2.c3p0.ComboPooledDataSource"
		destroy-method="close">
		<property name="driverClass" value="${jdbc.driverClassName}" />
		<property name="jdbcUrl" value="${jdbc.url}" />
		<property name="user" value="${jdbc.username}" />
		<property name="password" value="${jdbc.password}" />
		<property name="maxPoolSize" value="${jdbc.maxPoolSize}" />
	</bean> -->

	<!-- Data Source -->
	<bean id="dataSource"
		class="org.springframework.jdbc.datasource.SimpleDriverDataSource">
		<property name="driverClass" value="oracle.jdbc.driver.OracleDriver" />
		<property name="url" value="jdbc:oracle:thin:@localhost:1521:xe" />
		<property name="username" value="scott" />
		<property name="password" value="tiger" />
	</bean>

	<!-- 스프링 jdbc 즉 스프링으로 oracle 디비 연결 -->
	<bean id="sqlSessionFactory" class="org.mybatis.spring.SqlSessionFactoryBean">
		<property name="dataSource" ref="dataSource" />
		<property name="configLocation" value="classpath:configuration.xml" />
		<property name="mapperLocations" value="classpath:sql/*.xml" />
	</bean>

	<bean id="session" class="org.mybatis.spring.SqlSessionTemplate">
		<constructor-arg index="0" ref="sqlSessionFactory" />
	</bean>

</beans>
- DB 연동을 Spring 쪽에서 제어하므로, root-context.xml 안에 DB 연결에 필요한 내용을 처리
- 이전 프로젝트와 다르게 configuration.xml 에는 DTO alias 내용만 남고 나머지 설정은 모두 이 root-context. 가 처리
- root-context.xml 에서는 어노테이션 기반 DI + Setter DI 다 있다
- root-context.xml 에서 beans 가 루트 엘리먼트이고 안에서 3개의 bean 을 만들어서 처리하고 있다
- 3개의 bean 을 만들면서 2번의 Setter DI 와 1번의 Constructor DI 를 하고 있다
root-context.xml 부분 1
	<!-- Data Source -->
	<bean id="dataSource"
		class="org.springframework.jdbc.datasource.SimpleDriverDataSource">
		<property name="driverClass" value="oracle.jdbc.driver.OracleDriver" />
		<property name="url" value="jdbc:oracle:thin:@localhost:1521:xe" />
		<property name="username" value="scott" />
		<property name="password" value="tiger" />
	</bean>
- 여러 클래스를 사용 가능하지만 현재는 SimpleDriverDataSource 클래스를 사용, 클래스마다 정해진 Property 들이 달라진다
- Setter DI 를 통해 필드 driverClass, url, username, password 에 value 의 값들을 주입하고 있다
- 오라클 연결 관련 내용(계정명, 비번 등) 들을 주입하고 있다
root-context.xml 부분 2
	<!-- 스프링 jdbc 즉 스프링으로 oracle 디비 연결 -->
	<bean id="sqlSessionFactory" class="org.mybatis.spring.SqlSessionFactoryBean">
		<property name="dataSource" ref="dataSource" />
		<property name="configLocation" value="classpath:configuration.xml" />
		<property name="mapperLocations" value="classpath:sql/*.xml" />
	</bean>
- SqlSessionFactoryBean 객체 sqlSessionFactory 를 생성하고 있다
- SqlSessionFactoryBean 클래스의 프로퍼티 dataSource, configLocation, mapperLocations 에 값들을 주입하고 있다
DB 연결 코드 (root-context.xml 부분 2-1)
<property name="dataSource" ref="dataSource" />- dataSource 프로퍼티로 위에서 만든 SimpleDriverDataSource 객체인 dataSource 객체를 주입시킨다
- 이 코드가 DB 를 연결하는 코드이다
DB 연결 코드 (root-context.xml 부분 2-2)
<property name="configLocation" value="classpath:configuration.xml" />- configLocation : MyBatis 환경설정 파일(Configuration.xml) 의 위치를 설정하는 역할
- MyBatis 환경설정 파일인 configuration.xml 을 불러오고 있다
- MyBatis 환경설정 파일인 configuration.xml 은 resources 패키지 아래에 있으므로 classpath: 를 붙여서 불러온다
+ configuration.xml 에는 3가지 내용(DTO alias, DB접속 내용, Mapper 파일 호출) 중 DTO alias 설정하는 코드만 남아있다
DB 연결 코드 (root-context.xml 부분 2-3)
<property name="mapperLocations" value="classpath:sql/*.xml" />- mapperLocations : Mapper 파일들의 위치를 설정하는 역할
- Mapper 파일들은 resources 폴더 내에 있으므로 classpath: 를 붙이고 그 안에서도 sql 폴더 안에 있으므로 "classpath:sql/" 를 설정
- 그리고 resources/sql 안의 모든 xml 파일을 불러오라는 의미로 "classpath:sql/*xml"

root-context.xml 부분 3
	<bean id="session" class="org.mybatis.spring.SqlSessionTemplate">
		<constructor-arg index="0" ref="sqlSessionFactory" />
	</bean>
- SqlSessionTemplate 클래스는 SQL 5개 메소드를 제공하는 myBatis 에서 지원하는 구현클래스이다
- 인터페이스 SqlSession 로는 객체를 생성할 수 없으므로 구현 클래스인 SqlSessionTemplate 으로 객체를 생성해야한다
+ SqlSessionTemplate 객체를 생성했으므로 그걸 업캐스팅해서 SqlSession에 주입해도 되고 SqlSessionTemplate 에 주입해도 된다
- 이 코드로 SqlSessionTemplate 객체를 생성하고 있다, 이 객체는 자동으로 DAO 의 @Autowired 가 붙은 SqlSessionTemplate 또는 SqlSession 으로 주입된다
- 이 코드로 이렇게 SqlSessionTemplate 객체를 생성해야만 DAO 클래스 안에서 @Autowired 로 SqlSessionTemplate 또는 SqlSesssion 으로 객체 주입 가능하다
+ 이 코드가 없어도 Service 객체는 Controller 로 , DAO 객체는 Service 로 주입된다, 단 SqlSession 객체를 DAO 에 주입할때는 반드시 이 코드가 있어야함
- Constructor DI 를 하고 있다, 여기가 유일하게 Constructor DI 를 하는 곳이다
- 즉, 생성자의 매개변수로 주입한다, index = "0" 은 생성자 매개변수 중 첫번째 매개변수를 의미함, 그 생성자의 첫번째 매개변수에 위에서 생성된 sqlSessionFactory 객체를 주입함
- 생성자를 통해 SqlSessionTemplate 객체의 프로퍼티를 채우고, 그렇게 생성된 SqlSessionTemplate 객체를 DAO 의 필드로 주입하는 것임
+ 이러한 내용을 프로젝트 myBatis1 에서는 Configuration.xml 과 DAO 에서 처리했다
- Configuration.xml 에서 DB 연결하고 Mapper 파일을 불러왔다
- DAO 에서 Configuration.xml 을 읽어오고 SqlSession 객체를 생성했었다
-프로젝트 myBatis1 (MyBatis 에서 DB연동) 의 내용을 잠시 보자
프로젝트 myBatis1 의 Configuration.xml

- 여기서 DB 연결과 Mapper 파일을 불러왔었다
- 그리고 DAO 에서는 이 Configuration.xml 을 읽어왔다

- 즉 흐름은 아래와 같았다

- 현재 프로젝트 myBatis2 에서 DB 연동하는 걸 보자
- 위와 비교
DB 접속 내용
- root-context.xml 에서 SimpleDriverDataSource 객체를 생성할때 필드값으로 들어간다
- 이 SimpleDriverDataSource 객체를 SqlSessionFactoryBean 객체를 생성할때 주입함
Mapper 파일을 불러오는 방법 (DAO 에서 Mapper 파일에 접근 가능한 이유)
- SqlSessionFactoryBean 객체에는 Mapper 파일의 위치가 들어간다
- SqlSessionFactoryBean 객체인 sqlSessionFactory 가 SqlSessionTemplate 객체를 생성할때 ref 로 주입되었기 떄문에 DAO 에서 Mapper 파일을 불러와서 id 로 SQL문에 접근 가능한 것
- 현재 프로젝트 myBatis2 에서는 root-context.xml 을 읽어서 SqlSession 객체를 생성한다
파일들 살펴보기 : DeptDaoImpl.java
- DAO 구현 클래스 중 하나를 살펴보자
- DeptDaoImpl.java
package myBatis2.dao;

import java.util.List;
import org.mybatis.spring.SqlSessionTemplate;
import org.springframework.beans.factory.annotation.Autowired;
import org.springframework.stereotype.Repository;
import myBatis2.model.Dept;

@Repository
public class DeptDaoImpl implements DeptDao {
	@Autowired
	private SqlSessionTemplate st;

	public List<Dept> list() {
		return st.selectList("deptns.list");
	}

	public int insert(Dept dept) {
		return st.insert("deptns.insert", dept);
	}

	public Dept select(int deptno) {
		return st.selectOne("deptns.select", deptno);
	}

	public int update(Dept dept) {
		return st.update("deptns.update", dept);
	}

	public int delete(int deptno) {
		return st.delete("deptns.delete", deptno);
	}
}
- @Autowired 어노테이션을 사용해서 SqlSession 객체를 주입하고 있다
- 인터페이스인 SqlSession 을 주입해도 되고, 그걸 상속받는 구현 클래스인 SqlSessionTemplate 를 주입해도 된다
- SqlSession 은 SQL문을 실행시키는 메소드를 제공하는 인터페이스
- 여기선 구현클래스인 SqlSessionTemplate 으로 객체를 주입하고 있다
- 주입되어야만 5개의 메소드(insert(), update(), delete(), selectOne(), selectList() 를 사용 가능함
- root-context.xml 에서 DB 연동을 처리했기 때문에 여기서 @Autowired 로 SqlSession 객체를 주입 가능한 것
- root-context.xml 에서 SqlSessionTemplate 객체를 생성했고 어노테이션 기반 DI 로 여기에 주입했다
프로젝트 myBaits1 vs 프로젝트 myBatis2
프로젝트 myBaits1
- 이전 프로젝트 myBatis1은 여기서 MyBatis 환경설정 파일을 읽어와서 SqlSession 객체를 생성했다
- 이전 프로젝트에서는 MyBatis 환경설정 파일을 썼으므므로 @Autowired 로 SqlSession 주입 불가
프로젝트 myBatis2
- 현재 프로젝트 myBatis2는 여기서 @Autowired 어노테이션으로 SqlSession 을 주입받았다
- root-context.xml 에서 DB 연동을 처리했기 때문에 여기서 @Autowired 로 SqlSession 객체를 주입 가능한 것
- 그 root-context.xml 에서 객체 생성 및 주입을 했고 시점은 root-context.xml 이 web.xml 에 의해 읽어졌을때
파일들 살펴보기 : DeptServiceImpl.java
- Service 클래스 중 하나를 보자
- DeptServiceImpl.java
package myBatis2.service;

import java.util.List;

import org.springframework.beans.factory.annotation.Autowired;
import org.springframework.stereotype.Service;

import myBatis2.dao.DeptDao;
import myBatis2.model.Dept;

@Service
public class DeptServiceImpl implements DeptService {
	@Autowired
	private DeptDao dd;

	public List<Dept> list() {
		return dd.list();
	}

	public int insert(Dept dept) {
		return dd.insert(dept);
	}

	public Dept select(int deptno) {
		return dd.select(deptno);
	}

	public int update(Dept dept) {
		return dd.update(dept);
	}

	public int delete(int deptno) {
		return dd.delete(deptno);
	}
}
- DAO 인터페이스 DeptDao 로 객체를 주입하고 있다
- @Autowired 로 객체를 주입할때 인터페이스로 객체를 주입해도되고, 구현클래스로 주입해도 된다
+ 단 어노테이션을 붙일때는 구현클래스 위에만 붙인다
파일들 살펴보기 : EmpController.java
- Controller 클래스 중 하나를 보자
- EmpController.java
package myBatis2.controller;

import java.sql.Date;
import java.util.List;

import org.springframework.beans.factory.annotation.Autowired;
import org.springframework.stereotype.Controller;
import org.springframework.ui.Model;
import org.springframework.web.bind.annotation.RequestMapping;

import myBatis2.model.Dept;
import myBatis2.model.Emp;
import myBatis2.service.DeptService;
import myBatis2.service.EmpService;

@Controller
public class EmpController {
	@Autowired
	private EmpService es;
	@Autowired
	private DeptService ds;

	@RequestMapping("empList.do")
	public String empList(int deptno, Model model) {
		Dept dept = ds.select(deptno);
		List<Emp> list = es.list(deptno);
		model.addAttribute("dept", dept);
		model.addAttribute("list", list);
		return "emp/empList";
	}

	@RequestMapping("empInsertForm.do")
	public String empInsertForm(Model model) {
		List<Dept> deptList = ds.list();
		List<Emp> empList = es.empList();
		model.addAttribute("deptList", deptList);
		model.addAttribute("empList", empList);
		return "emp/empInsertForm";
	}

	@RequestMapping("dupCheck.do")
	public String dupCheck(int empno, Model model) {
		System.out.println("empno:"+empno);
		Emp emp = es.select(empno);
		String msg = "";
		if (emp != null)
			msg = "이미 있는 데이터입니다";
		else
			msg = "사용 가능한 사번 입니다";
		model.addAttribute("msg", msg);
		return "emp/dupCheck";
	}

	@RequestMapping("empInsert.do")
//	public String empInsert(Emp emp, String hiredate1, Model model) {
	public String empInsert(Emp emp, Model model) {
//		emp.setHiredate(Date.valueOf(hiredate1)); // String -> Date 형변환
		int result = es.insert(emp);
		model.addAttribute("result", result);
		model.addAttribute("deptno", emp.getDeptno());
		return "emp/empInsert";
	}

	@RequestMapping("empView.do")
	public String empView(int empno, Model model) {
		Emp emp = es.select(empno);
		model.addAttribute("emp", emp);
		return "emp/empView";
	}

	@RequestMapping("empDelete.do")
	public String empDelete(int empno, Model model) {
		Emp emp = es.select(empno);
		int result = es.delete(empno);
		model.addAttribute("result", result);
		model.addAttribute("deptno", emp.getDeptno());
		return "emp/empDelete";
	}

	@RequestMapping("empUpdateForm.do")
	public String empUpdateForm(int empno, Model model) {
		Emp emp = es.select(empno);
		List<Dept> deptList = ds.list();
		model.addAttribute("emp", emp);
		model.addAttribute("deptList", deptList);
		return "emp/empUpdateForm";
	}

	@RequestMapping("empUpdate.do")
	public String empUpdate(Emp emp, Model model) {
		int result = es.update(emp);
		model.addAttribute("deptno", emp.getDeptno());
		model.addAttribute("result", result);
		return "emp/empUpdate";
	}

	@RequestMapping("empAllList.do")
	public String empAllList(Model model) {
		List<Emp> list = es.empAllList();
		model.addAttribute("list", list);
		return "emp/empAllList";
	}
}
- Service 객체를 2개 주입받고 있음
- @Autowired 로 주입 2개 이상도 가능하다
흐름 보기
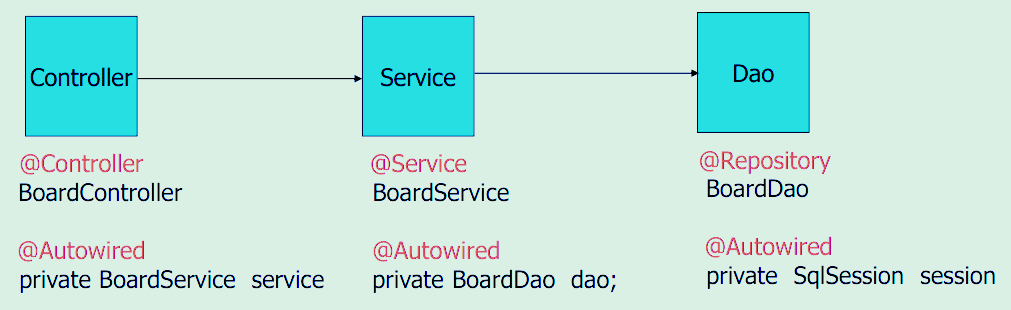
- @Autowired 로 객체를 주입할때 인터페이스로 객체를 주입해도되고, 구현클래스로 주입해도 된다
- 여기서는 다 인터페이스로 주입하고 있음 ex) BoardService, BoardDao, SqlSession
필요한 bean 객체를 어노테이션 기반으로 주입하기 위한 조건
1. base-package 에 적힌 해당 패키지의 모든 클래스를 읽어오는 코드가 있어야함
2. 어노테이션 4개 중 하나 붙어있어야함
3. 만들고자 하는 객체 위에 @Autowired 어노테이션을 붙여야함
프로젝트 실행
- index.jsp 또는 프로젝트 실행
<%@ page language="java" contentType="text/html; charset=UTF-8"
    pageEncoding="UTF-8"%>

<!DOCTYPE html>
<html>
<head>
<meta charset="UTF-8">
<title>Insert title here</title>
</head>
<body>
<script type="text/javascript">
	location.href="deptList.do";
</script>
</body>
</html>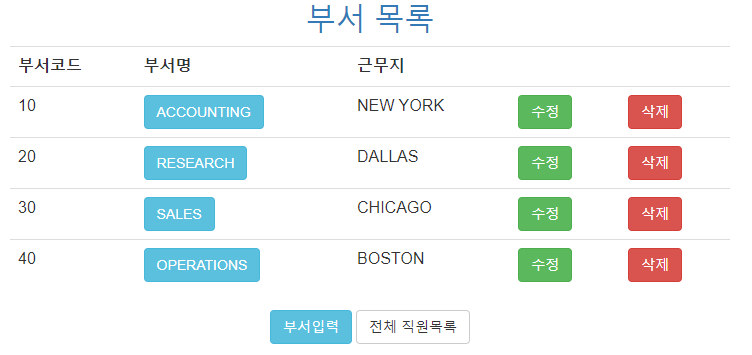
전체 직원 목록
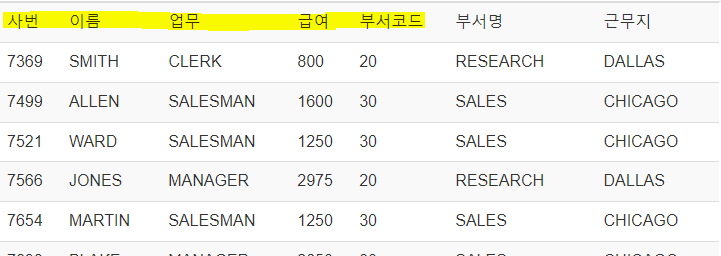
- 사번, 이름, 업무, 급여, 부서코드는 Emp 테이블에 있는 내용이다
- 부서모드, 부서명, 근무지는 Dept 테이블에 있는 내용이다
- 검색할때 조인해서 검색해서 그걸 뿌려준 것이다
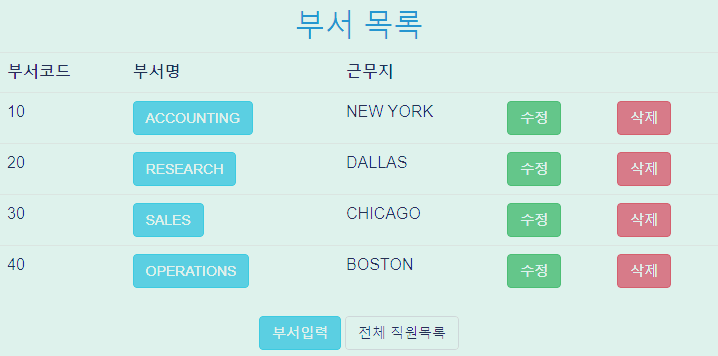
부서 목록
- 현재는 삭제가 되지 않음, Emp 테이블에서 참조하는 Foreign Key 가 없을때는 삭제됨
- 그 외, 부서 입력(추가), 사원 입력(추가) 도 가능하다
조인(join) 과 DTO
- 조인한 결과를 DTO 객체를 생성하여 저장해야한다
- 현재 DTO 클래스는 Dept 와 Emp 가 있다
+ 테이블 개수가 늘어나면 Mapper 파일, Controller , Service , DAO , DTO 도 1개씩 늘어나는게 일반적
- Dept 테이블에 대해 매핑을 잡을때를 위해 Dept DTO의 필드명은 Dept 테이블의 컬럼명과 일치시켰다
- Emp 테이블에는 8 개의 컬럼이 있지만 Emp DTO 의 필드는 8개보다 많다, 조인을 했을때 조인한 결과를 이 DTO 객체에 매핑을 통해서 저장할 것

- deptno, dname, loc 는 Emp 테이블에는 없는 컬럼이다, 조인을 했을때 그 결과를 저장하기 위해 만든 컬럼이다
+ Configuration.xml 에서 Dept DTO 의 alias 값을 "dept", Emp DTO 의 alias 값을 "emp" 로 설정했다

- 이제 실행되는 순서대로 따라가보자
프로젝트 myBatis2 : 부서 목록
+ 전체 코드는 나중에 한번에 올림
- index.jsp
<%@ page language="java" contentType="text/html; charset=UTF-8"
    pageEncoding="UTF-8"%>

<!DOCTYPE html>
<html>
<head>
<meta charset="UTF-8">
<title>Insert title here</title>
</head>
<body>
<script type="text/javascript">
	location.href="deptList.do";
</script>
</body>
</html>
- "deptList.do" 로 요청한다, DispatcherServlet -> Controller 로 이동
- 2개의 Controller 클래스가 있지만 @RequestMapping 이 맞는 곳으로 찾아가므로 신경쓰지 않아도 된다
Controller 클래스 DeptController.java 에서 "deptList.do" 요청 부분만 + @Autowired 부분
	@Autowired
	private DeptService ds;

	// 부서 목록
	@RequestMapping("deptList.do")
	public String deptList(Model model) {
		List<Dept> list = ds.list();
		model.addAttribute("list", list);
		return "deptList";
	}
- @Autowired 를 통해서 DeptServiceImpl 객체를 인터페이스인 DeptService ds 에 주입
+ 엄밀히 말하면 구현클래스가 주입되는 것이지만, 어차피 업캐스팅 하므로 그냥 DeptService 객체가 됨
+ 그래서 하나의 인터페이스에 구현클래스를 2개를 만들면 안된다
- 위에서 주입한 Service 객체 ds 를 사용해서 Service 의 list() 를 호출
- 2개이상의 데이터를 검색해서 List 로 돌아올 것이므로 리턴을 List 로 받는다
<돌아온 후>
- Dept DTO 객체를 저장하고 있는 리스트를 반환받았고 그걸 list 에 저장함
- 그 list 를 Model 객체에 저장하고, /WEB-INF/views/deptList.jsp 로 간다
+ Model 에 리스트가 저장되었으므로 View 페이지에서 출력할때는 EL 이 forEach문의 items 에 들어감
Service 클래스 DeptServiceImpl.java 에서 list() 메소드 부분만 + @Autowired 부분
	@Autowired
	private DeptDao dd;

	public List<Dept> list() {
		return dd.list();
	}
- @Autowired 를 통해서 DeptDaoImpl 객체를 인터페이스인 DeptDao dd 에 주입
+ 엄밀히 말하면 구현클래스가 주입되는 것이지만, 어차피 업캐스팅 하므로 그냥 DeptDao 객체가 됨
+ 그래서 하나의 인터페이스에 구현클래스를 2개를 만들면 안된다
- 돌려받은 값(리스트)을 그대로 리턴
DAO 클래스 DeptDaoImpl.java 에서 list() 메소드 부분만 + @Autowired 부분
	@Autowired
	private SqlSessionTemplate st;

	public List<Dept> list() {
		return st.selectList("deptns.list");
	}
- @Autowired 를 통해서 SqlSessionTemplate 객체를 SqlSessionTemplate st 에 주입
- 2개 이상의 데이터를 검색할 것이므로 selectList() 를 호출
- 이 selectList() 메소드는 위에서 SqlSessionTemplate 객체를 구해왔으므로 사용 가능한 것
- 현재는 Mapper 파일이 2개이므로 id 중복을 피하기 위해 namespace 를 사용한다
+ Mapper 파일 중 하나인 Dept.xml 의 namespace 는 "deptns"
- 그래서 selectList("deptns.list") 는 Dept.xml 파일에서 id 가 list 인 태그의 select SQL문을 불러오는 것을 의미
- 돌려받은 값(리스트)을 그대로 리턴
Mapper 파일 Dept.xml 에서 id 가 "list" 인 태그 부분만 + resultMap
	<!-- Use type aliases to avoid typing the full classname every time. -->
	<resultMap id="deptResult"    type="dept">
		<result property="deptno" column="deptno" />
		<result property="dname"  column="dname" />
		<result property="loc"	  column="loc" />
	</resultMap>

	<select id="list" resultMap="deptResult">
		select * from dept order by deptno
	</select>
- Dept 테이블의 모든 데이터를 검색
- order by 로 부서번호 기준 오름차순 정렬되어서 돌려준다
- 현재는 Dept DTO 클래스 프로퍼티명과 검색되는 컬럼명인 Dept 테이블의 컬럼명이 일치하므로 resultMap 을 사용하지 않아도 된다, 사용은 하고 있음
- resultMap 에서 type 은 "dept" 이다, 즉 Dept DTO 타입,
+ 리스트로 반환할때도 type 이나 returyType 에는 DTO 를 써야함
- 이제 다시 DAO 로 돌아가야한다, 돌아갈때의 설명은 하늘색 하이라이트로 표시
- 돌아갔다가 이제 View 페이지로 오게 된다
VIew 페이지 deptList.jsp
- deptList.jsp
<%@ page language="java" contentType="text/html; charset=UTF-8"
	pageEncoding="UTF-8"%>
<%@ include file="header.jsp"%>

<!DOCTYPE html>
<html>
<head>
<meta charset="UTF-8">
<title>Insert title here</title>
</head>
<body>
	<div class="container" align="center">
		<h2 class="text-primary">부서 목록</h2>
		<table class="table table-hover">
			<tr>
				<th>부서코드</th>
				<th>부서명</th>
				<th>근무지</th>
				<th></th>
				<th></th>
			</tr>
			<c:if test="${empty list}">
				<tr>
					<td colspan="5">데이터가 없습니다</td>
				</tr>
			</c:if>
			<c:if test="${not empty list }">
				<c:forEach var="dept" items="${list}">
					<tr>
						<td>${dept.deptno}</td>
						<td><a href="empList.do?deptno=${dept.deptno}"
							   class="btn btn-info">${dept.dname}</a></td>
						<td>${dept.loc }</td>
						<td><a href="deptUpdateForm.do?deptno=${dept.deptno }"
							   class="btn btn-success">수정</a></td>
						<td><a href="deptDelete.do?deptno=${dept.deptno }"
							   class="btn btn-danger">삭제</a></td>
				</c:forEach>
			</c:if>
		</table>
		<a href="deptInsertForm.do" class="btn btn-info">부서입력</a>
		<a href="empAllList.do" class="btn btn-default">전체 직원목록</a>
	</div>
</body>
</html>
- list 가 비어있는 경우는 ${empty list} 로 확인하고, "데이터가 없습니다" 뿌려주기
- list 가 비어있지 않는 경우는 Model 에 저장되어있는 걸 EL 로 가져와서 부서 목록을 출력해준다
- forEach 문의 itmes 에 ${list} 가 들어가게 되고, 반복문으로 하나씩 Dept DTO 객체를 가져와서 뿌려준다
- '전체 직원 목록' 클릭시 "empAllList.do" 로 요청한다
프로젝트 myBatis2 : 전체 직원 목록
+ 전체 코드는 나중에 한번에 올림
- '전체 직원 목록' 클릭시
- Dept, Emp 테이블을 등가조인해서 결과를 한번에 출력하고 있다

- '전체 직원 목록' 클릭시 "empAllList.do" 로 요청한다
EmpController.java 에서 @Autowired 부분만
	@Autowired
	private EmpService es;
	@Autowired
	private DeptService ds;
- 주입할 객체가 여러개인 경우엔 @Autowired 를 개별적으로 써야한다, 1번만 써선 안된다
- DeptService 객체를 주입하고 있고, EmpService 객체도 주입하고 있다
+ 엄밀히 말하면 구현클래스가 주입되는 것이지만, 어차피 업캐스팅 하므로 그냥 DeptService 객체, EmpService 객체가 됨
+ 그래서 하나의 인터페이스에 구현클래스를 2개를 만들면 안된다
- 2개의 Service 객체를 주입받음
Controller 클래스 EmpController.java 에서 "empAllList.do" 요청 부분만
	// 전체 직원 목록
	@RequestMapping("empAllList.do")
	public String empAllList(Model model) {
		List<Emp> list = es.empAllList();
		model.addAttribute("list", list);
		return "emp/empAllList";
	}
- 위에서 주입받은 EmpService 객체 es 를 사용해서 Service 클래스 메소드인 empAllList() 호출
- 2개 이상의 데이터를 검색하므로 리스트로 값이 돌아올 것이므로 List 로 받음
<돌아올 때>
- 돌아온 List 에는 Emp DAO 객체들이 들어있다
- prefix 로 잡혀있는 경로까지는 생략하고, 그 하위의 경로는 적어야한다
- /WEB-INF/views 는 생략하고, 하위의 emp 폴더는 적어야함, 그래서 "emp/empAllList" 이다
- /WEB-INF/views/emp/empAllList.jsp 파일로 이동
Service 클래스 EmpServiceImpl.java 에서 empAllList() 메소드 부분만 + @Autowired 부분
	@Autowired
	private EmpDao ed;
public List<Emp> empAllList() {
return ed.empAllList();
}- 위에서 @Autowired 로 주입받은 EmpDao 객체 ed 를 사용해서 DAO 클래스의 메소드인 empAllList() 호출
DAO 클래스 EmpDaoImpl.java 에서 empAllList() 메소드 부분만 + @Autowired 부분
	@Autowired
	private SqlSessionTemplate sst;
public List<Emp> empAllList() {
return sst.selectList("empAllList");
}- 위에서 @Autowired 로 주입받은 SqlSEssionTemplate 객체 sst 를 사용해서 지원메소드인 selectList() 사용
- 2개 이상의 데이터를 검색하므로 selectList() 메소드 사용
- 반환되는 List 에 들어가는 것은 Emp DTO 객체만 들어간다는 의미로 제네릭 <Emp> 사용
Mapper 파일 Emp.xml 에서 id 가 "empAllList" 인 태그 부분만 + resultMap
	<!-- Use type aliases to avoid typing the full classname every time. -->
	<resultMap id="empResult"    	type="emp">
		<result property="empno" 	column="empno" />
		<result property="ename"  	column="ename" />
		<result property="job"		column="job" />
		<result property="mgr" 		column="mgr" />
		<result property="hiredate" column="hiredate" />
		<result property="sal"	  	column="sal" />
		<result property="comm"	   	column="comm" />
		<result property="deptno"   column="deptno" />
		<result property="dname"	column="dname" />
		<result property="loc"   	column="loc" />
	</resultMap>
+ 현재는 모든 10개의 테이블과 검색결과의 컬럼명이 일치하므로 일일히 resultMap 을 사용할 필요 없다, 여기선 resultMap 을 사용했음
- Emp DTO 가 저장된 리스트를 리턴하므로, type 을 "emp" 로 설정함
	<select id="empAllList" resultMap="empResult">
		select e.*,dname,loc from emp e, dept d
			where e.deptno=d.deptno order by empno
	</select>
- from 절에서 emp 테이블의 별칭을 e, dept 테이블의 별칭을 d 로 설정
- 등가조인(과거부터 사용하던 방식, 안시 방식 등이 있다) 을 사용하고 있음
- e 의 모든 컬럼과 dname, loc 를 검색
+ 공통 컬럼이 아닌 경우는 dname, loc 처럼 그냥 쓰면 된다
- 등가 조인을 위해 e.deptno 와 d.deptno 가 같은 경우만 가져옴
+ 두 테이블 사이 공통적인 컬럼이 있을때만 가능한게 등가조인
- 사원번호 순서대로 정렬, 사원번호가 빠른(작은) 순대로 나온다
- Emp DTO 는 10개의 정보를 저장하므로 검색결과를 모두 저장할 수 있으므로 resultMap 을 쓰지 않고 resultType 에 "emp" 를 써도 된다
View 페이지 empAllList.jsp
- emp/empAllList.jsp
<%@ page language="java" contentType="text/html; charset=UTF-8"
	pageEncoding="UTF-8"%>
<%@ include file="../header.jsp"%>

<!DOCTYPE html>
<html>
<head>
<meta charset="UTF-8">
<title>Insert title here</title>
</head>
<body>
	<div class="container">
		<table class="table table-striped">
			<tr>
				<td>사번</td>
				<td>이름</td>
				<td>업무</td>
				<td>급여</td>
				<td>부서코드</td>
				<td>부서명</td>
				<td>근무지</td>
			</tr>
			<c:forEach var="emp" items="${list }">
				<tr>
					<td>${emp.empno }</td>
					<td>${emp.ename }</td>
					<td>${emp.job }</td>
					<td>${emp.sal }</td>
					<td>${emp.deptno }</td>
					<td>${emp.dname }</td>
					<td>${emp.loc }</td>
				</tr>
			</c:forEach>
		</table>
		<a href="deptList.do" class="btn btn-default">부서목록</a>
	</div>
</body>
</html>
- 검색된 결과가 Model 을 통해 넘어왔다, 이 값은 Emp DTO 객체를 저장하는 리스트이다
- 리스트가 Model 객체에 저장되었으므로 forEach 태그의 items 값으로 들어간다
- 각각의 Emp DTO 객체는 10개의 값을 저장하고 있음, 그 값들 중 일부를 출력한다
- 또한 forEach 를 통해 하나씩 가져온 각각의 DTO 객체의 필드에 접근할땐 ${emp.필드명} 를 사용함
+ ${emp.empno} 는 내부적으로는 ${emp.getEmpno()} 이다
- 사번, 이름, 업무, 급여, 부서코드는 Emp 테이블, 부서코드, 부서명, 근무지는 Dept 테이블의 데이터
- 아래의 '부서목록' 클릭시 "deptlist.do" 로 요청한다 (위에서 설명했다)
- index.jsp 에서 요청했던 내용과 같음
- 사원 14명에 대한 정보를 출력한다

프로젝트 myBatis2 : 부서 입력폼
+ 전체 코드는 나중에 한번에 올림
- 입력폼으로 먼저 이동한 후, 거기서 입력을 해야한다, 입력 폼만 먼저 보자
- deptList.jsp (부서 목록) 에서 '부서입력' 클릭시 "deptInsertForm.do" 로 요청한다
<a href="deptInsertForm.do" class="btn btn-info">부서입력</a>
- 부서 입력 폼으로 가게 됨
Controller 클래스 DeptController.java 에서 "deptInsertForm.do" 요청 부분만
	// 부서 등록폼
	@RequestMapping("deptInsertForm.do")
	public String deptInsertForm() {
		return "deptInsertForm";
	}
- 입력폼으로 가는데는 DB 연동이 필요하지 않음, Service 클래스가 아닌 바로 View 페이지로 간다
- 바로 View 파일인 /WEB-INF/views/deptInsertForm.jsp 로 이동한다
View 페이지 deptInsertForm.jsp
- deptInsertForm.jsp
<%@ page language="java" contentType="text/html; charset=UTF-8"
	pageEncoding="UTF-8"%>
<%@ include file="header.jsp"%>

<!DOCTYPE html>
<html>
<head>
<meta charset="UTF-8">
<title>Insert title here</title>
</head>
<body>
	<div class="container" align="center">
		<h2 class="text-primary">부서정보 입력</h2>
		<form action="deptInsert.do" method="post">
			<table class="table table-hover">
				<tr>
					<td>부서코드</td>
					<td><input type="number" maxlength="2" name="deptno"
						required="required" autofocus="autofocus"></td>
				</tr>
				<tr>
					<td>부서명</td>
					<td><input type="text" name="dname" required="required"></td>
				</tr>
				<tr>
					<td>근무지</td>
					<td><input type="text" name="loc" required="required"></td>
				</tr>
				<tr>
					<td colspan="2"><input type="submit" value="확인"></td>
				</tr>
			</table>
		</form>
	</div>
</body>
</html>
- 부서 입력 폼에서 입력을 한 후 "확인" 을 누르면 "deptInsert.do" 로 요청한다
- "deptInsert.do" 는 실제 입력(insert) 을 위한 요청임
- 각 입력양식의 name 값은 Dept DTO 의 컬럼명과 일치시켰다, "deptInsert.do" 요청을 받는 곳에서 Setter 메소드 직접 사용 없이 바로 DTO 객체에 넘어온 값들이 저장되도록 하기 위해서이다
- 부서 입력 폼으로 가보자

- 부서 입력 폼에서 입력을 한 후 "확인" 을 누르면 "deptInsert.do" 로 요청한다
프로젝트 myBatis2 : 부서 입력 (부서 추가 등록)
- 부서 입력 폼에서 입력을 한 후 "확인" 을 누르면 "deptInsert.do" 로 요청한다
Controller 클래스 DeptController.java 에서 "deptInsert.do" 요청 부분만
	// 부서 등록
	@RequestMapping("deptInsert.do")
	public String deptInsert(@ModelAttribute Dept dept,
			                 Model model) {
		Dept dt = ds.select(dept.getDeptno()); // 부서번호 중복 검사
		if (dt == null) { // 부서번호가 중복이 아닌 경우
			int result = ds.insert(dept);
			model.addAttribute("result", result);
		} else { // 부서번호 중복
			model.addAttribute("msg", "이미 있는 데이터입니다");
			model.addAttribute("result", -1);
		}
		return "deptInsert";
	}
- 앞의 부서 입력폼에서 넘어온 3가지값을 @ModelAttribute 로 한번에 받아서 Dept DTO 객체 dept 에 저장함
- 부서번호가 중복되지 않을때만 가입을 시키기 위해 부서번호가 중복인지를 중복검사를 검색해야함
<부서번호 중복 검사>
- 위에서 주입된 Dept Service 객체 ds를 사용해서 Service 클래스의 select() 를 호출, 호출하며 부서번호를 넘겨준다 *아래에
<select() 에서 돌아왔을 때>
- 부서 번호로 DB 에 검색했을때 돌아오는 값이 없어야 부서번호가 중복이 아닌 경우이다 그래서 dt == null 을 확인
<부서 입력>
- dt == null 인 경우, 즉 중복이 아닌 경우에는 위에서 주입된 Dept Service 객체 ds를 사용해서 Service 클래스의 insert() 를 호출
- insert() 를 호출하며 사용자가 부서 입력 폼에서 입력했던 데이터를 저장한 객체 dept 를 넘겨준다
<insert() 에서 돌아왔을 때>
- dt == null 인 경우, 즉 중복이 아닌 경우 insert()를 수행 후 돌아오면, result 에 1 을 받게 된다, Model 객체에 "result" (1) 을 저장해서 detpInsert.jsp 로 이동
- dt != null 인 경우, 즉 중복인 경우에는 Model 객체에 "msg" 와 "result"(-1) 을 저장해서 deptInsert.jsp 로 이동
- 입력에 성공했는지 확인하기 위해 리턴값을 result 변수로 받는다, 그 값을 Model 객체에 저장해서 View 에 넘김
+ 그럼 deptInsert.jsp 에서는 "result" 값을 확인해서 조건식을 통해 성공과 실패 처리를 한다
<부서번호 중복 검사>
Service 클래스 DeptServiceImpl.java 에서 select() 메소드 부분만
	public Dept select(int deptno) {
		return dd.select(deptno);
	}
DAO 클래스 DeptDaoImpl.java 에서 select() 메소드 부분만
	public Dept select(int deptno) {
		return st.selectOne("deptns.select", deptno);
	}
- 매개변수로 받은 부서번호 deptno 를 넘겨준다
Mapper 파일 Dept.xml 에서 id 가 "select" 인 태그 부분만
	<select id="select" parameterType="int" resultType="dept">
		select * from dept where deptno=#{deptno}
	</select>
- 전달받은 부서번호를 통해 (#{deptno}) 데이터를 검색한다
- 이때 검색되는 데이터가 있으면 부서번호가 중복되는 것임
- 리턴 자료형은 Dept DTO 객체인 dept
<부서 입력>
Service 클래스 DeptServiceImpl.java 에서 insert() 메소드 부분만
	public int insert(Dept dept) {
		return dd.insert(dept);
	}
- 전달받은 insert 할 Dept DTO 객체 dept 를 DAO의 insert() 를 호출할때 매개변수로 전달한다
DAO 클래스 DeptDaoImpl.java 에서 insert() 메소드 부분만
	public int insert(Dept dept) {
		return st.insert("deptns.insert", dept);
	}
- 위에서 주입받은 SqlSessionTemplate 객체 st 를 사용해서 insert() 메소드 사용
- insert 할 데이터를 저장한 객체 dept 를 전달함
Mapper 파일 Dept.xml 에서 id 가 "insert" 인 태그 부분만
	<insert id="insert" parameterType="dept">
		insert into dept values(#{deptno},#{dname},#{loc})
	</insert>
- 넘어온 객체 dept 에서 부서코드,부서명,지역 을 가져와서 DB의 dept 테이블에 삽입한다
- 넘어온 값이 객체이므로 그 ${객체의필드명} 으로 값을 가져온다
ex) #{deptno} 는 dept.getDeptno() 와 같은 의미
View 페이지인 deptInsert.jsp
- deptInsert.jsp
<%@ page language="java" contentType="text/html; charset=UTF-8"
	pageEncoding="UTF-8"%>
<%@ include file="header.jsp"%>

<!DOCTYPE html>
<html>
<head>
<meta charset="UTF-8">
<title>Insert title here</title>
</head>
<body>
	<c:if test="${result > 0 }">
		<script type="text/javascript">
			alert("입력 성공");
			location.href = "deptList.do";
		</script>
	</c:if>
	<c:if test="${result == 0 }">
		<script type="text/javascript">
			alert("입력 실패");
			history.go(-1);
		</script>
	</c:if>
	<c:if test="${result == -1 }">
		<script type="text/javascript">
			alert("${msg}");
			history.go(-1);
		</script>
	</c:if>
</body>
</html>
- 부서번호가 중복된 경우 result 는 -1 이 되므로, msg 를 출력하고 이전 페이지인 입력폼으로 돌아간다
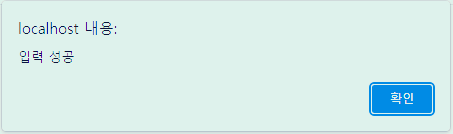
- 부서 등록에 성공한 경우 result 는 1 이 되므로, "입력 성공" 을 출력하고 목록 페이지로 가기 위해 "deptList.do" 요청
- 부서를 새로 등록해보자
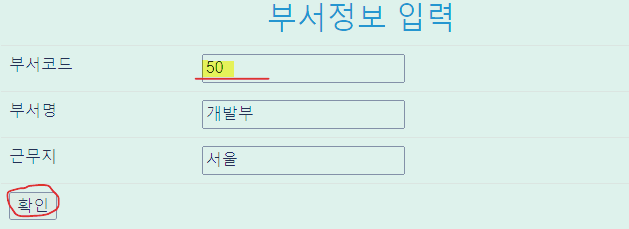
- 이때, 부서코드는 Primary Key 이므로 중복되선 안됨, 부서 입력시 10,20,30,40 을 부서코드로 쓰면 안된다
- 중복된 부서코드 입력시
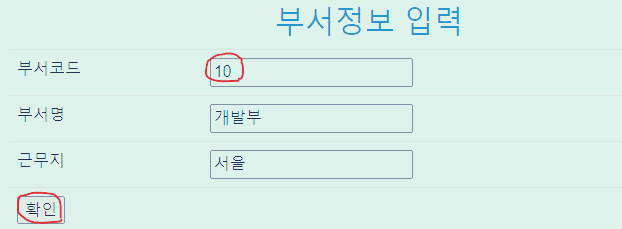

- 중복되지 않은 부서코드 입력시

프로젝트 myBatis2 : 부서 정보 수정폼
- 부서 정보 수정을 위해선 먼저 수정폼으로 가야한다
- 부서 정보 수정폼에서는 부서의 상세 정보를 구해서 뿌려줘야함
- deptList.jsp (목록 페이지) 에서 "수정" 을 클릭해보자

<td><a href="deptUpdateForm.do?deptno=${dept.deptno }"
			class="btn btn-success">수정</a></td>
- "수정" 클릭시 "deptUpdateForm.do" 로 요청한다
- GET 방식으로 해당 부서의 부서코드 deptno 를 가져간다
Controller 클래스 DeptController.java 에서 "deptUpdateForm.do" 요청 부분만
	// 부서 정보 수정폼
	@RequestMapping("deptUpdateForm.do")
	public String deptUpdateForm(int deptno, Model model) {
		Dept dept = ds.select(deptno);
		model.addAttribute("dept", dept);
		return "deptUpdateForm";
	}
- 앞에서 넘어온 네임값과 이름이 같은 변수 deptno 에 앞에서 넘어온 부서코드가 바로 저장됨
- @RequestParam("deptno") 가 int deptno 앞에 생략되어있다
- Service 객체 ds 를 사용해서 Service 클래스의 select() 메소드 호출, 호출 시 부서번호를 전달
<돌아온 후>
- select() 에서 돌려받은 Dept DTO 객체 dept 를 Model 객체에 저장
+ 객체 dept 가 Model 에 저장되었으므로 View 에서 출력할땐 ${dept.필드명} 으로 출력
- /WEB-INF/views/deptUpdateForm.jsp 로 간다
Service 클래스 DeptServiceImpl.java 에서 select() 메소드 부분만
	public Dept select(int deptno) {
		return dd.select(deptno);
	}
DAO 클래스 DeptDaoImpl.java 에서 select() 메소드 부분만
	public Dept select(int deptno) {
		return st.selectOne("deptns.select", deptno);
	}
- 하나의 부서에 대한 상세정보를 검색해서 가져오므로 selectOne() 메소드 사용
Mapper 파일 Dept.xml 에서 id 가 "select" 인 태그 부분만
	<select id="select" parameterType="int" resultType="dept">
		select * from dept where deptno=#{deptno}
	</select>
- 검색되는 결과는 1개이다
- 결과는 Dept DTO 형으로 돌려준다, 그래서 resultType 에 "dept" 를 썼다
View 페이지 deptUpdateForm.jsp
- deptUpdateForm.jsp
<%@ page language="java" contentType="text/html; charset=UTF-8"
	pageEncoding="UTF-8"%>
<%@ include file="header.jsp"%>

<!DOCTYPE html>
<html>
<head>
<meta charset="UTF-8">
<title>Insert title here</title>
</head>
<body>
	<div class="container" align="center">
		<h2 class="text-primary">부서정보 수정</h2>
		<form action="deptUpdate.do" method="post">
			<input type="hidden" name="deptno" value="${dept.deptno }">
			<table class="table table-hover">
				<tr>
					<td>부서코드</td>
					<td>${dept.deptno}</td>
				</tr>
				<tr>
					<td>부서명</td>
					<td><input type="text" name="dname" required="required"
							   value="${dept.dname}"></td>
				</tr>
				<tr>
					<td>근무지</td>
					<td><input type="text" name="loc" required="required"
							   value="${dept.loc}"></td>
				</tr>
				<tr>
					<td colspan="2"><input type="submit" value="확인"></td>
				</tr>
			</table>
		</form>
	</div>
</body>
</html>
- 객체 dept 가 Model 에 저장되었으므로 View 에서는 ${dept.필드명} 으로 가져온다
- 부서 정보 수정폼에 수정할 정보를 입력하고 "확인" 을 누르면 "deptUpdate.do" 로 요청한다
- 부서코드는 수정할 수 없다, 수정할 수 있는 정보는 부서명과 근무지이다.
+ 현재 부서코드는 입력양식이 아니라 출력만 하고 있으므로 넘어가지 않음, 그래서 hidden 객체 사용
- 부서코드 또한 수정시에 전달해야하므로 hiddden 객체를 통해 "deptUpdate.do" 로 전달

프로젝트 myBatis2 : 부서 정보 수정
- 부서 정보 수정폼 deptUpdateForm.jsp 에 수정할 정보를 입력하고 "확인" 을 누르면 "deptUpdate.do" 로 요청한다
Controller 클래스 DeptController.java 에서 "deptUpdate.do" 요청 부분만
	// 부서 정보 수정
	@RequestMapping("deptUpdate.do")
	public String deptUpdate(Dept dept, Model model) {
		int result = ds.update(dept);
		model.addAttribute("result", result);
		return "deptUpdate";
	}
- 앞에서 폼을 통해 넘어온 입력값들을 한번에 @ModelAttribuate (생략) 을 통해 Dept DTO 객체 dept 에 세팅한다
- Service 클래스의 객체 ds 를 사용해서 Service 의 update() 메소드 호출, 호출 시 수정할 정보를 저장한 객체 dept 를 전달
<돌아온 후>
- 수정이 성공적으로 완료되면 update() 에서 1 을 받게 되고, 그걸 result 변수에 저장
- 그 result 변수를 Model 에 저장하고 deptUpdate.jsp 로 이동
Service 클래스 DeptServiceImpl.java 에서 update() 메소드 부분만
	public int update(Dept dept) {
		return dd.update(dept);
	}
DAO 클래스 DeptDaoImpl.java 에서 update() 메소드 부분만
	public int update(Dept dept) {
		return st.update("deptns.update", dept);
	}
- update() 수행 후 DB 에서 수정을 성공하면, update() 는 1 을 자동으로 리턴한다 (수정한 데이터 개수)
- Mapper 파일의 SQL문을 가져오는 것이고, 실제 SQL문의 실행은 여기 DAO의 update() 문이 실행한다
- 그 1 을 다시 Service 로 리턴함
Mapper 파일 Dept.xml 에서 id 가 "update" 인 태그 부분만
	<update id="update" parameterType="dept">
		update dept set dname=#{dname},loc=#{loc} where deptno=#{deptno}
	</update>
- 수정할 정보를 저장한 Dept DTO 객체가 전달된다
- #{dname} 은 dept.getDname() 과 같은 의미
View 페이지 deptUpdate.jsp
- deptUpdate.jsp
<%@ page language="java" contentType="text/html; charset=UTF-8"
	pageEncoding="UTF-8"%>
<%@ include file="header.jsp"%>

<!DOCTYPE html>
<html>
<head>
<meta charset="UTF-8">
<title>Insert title here</title>
</head>
<body>
	<c:if test="${result > 0 }">
		<script type="text/javascript">
			alert("수정 성공");
			location.href = "deptList.do";
		</script>
	</c:if>
	<c:if test="${result <= 0 }">
		<script type="text/javascript">
			alert("수정 실패");
			history.go(-1);
		</script>
	</c:if>
</body>
</html>
- 여기서 "result" 값을 사용해서 성공 / 실패 처리를 한다
+ 삭제로 넘어가기전 상세 페이지 잠시 보기
- 부서 목록 페이지에서 부서명을 클릭하면 상세 페이지에서 해당 부서 소속 사원들을 보여준다
- 상세페이지는 나중에 구현할 것


- 즉 20번 부서를 참조하는 사원 테이블의 데이터들이 있으므로 20번 부서가 삭제되지 않음
- 20번 부서 삭제 시도시

프로젝트 myBatis2 : 부서 삭제
- deptList.jsp (목록 페이지) 에서 부서 삭제를 해보자

<td><a href="deptDelete.do?deptno=${dept.deptno }"
			class="btn btn-danger">삭제</a></td>
- "삭제" 를 누르면 "deptDelete.do" 로 요청한다, 그때 부서 코드인 deptno 를 GET 방식으로 전달한다
삭제시 주의
- Emp 테이블과 Dept 테이블은 참조관계가 있다
- 현재 내가 입력한 50번 부서는 참조하는 Foreign Key 가 없으므로 부서 삭제가 된다
- 10,20,30 번 부서는 참조하는 Foreign Key 가 있으므로 삭제되지 않는다
- 10,20,30 번 부서는 사원 테이블 Emp 에서 참조한다
+ 40번 부서는 원래 참조하는 사원이 없으므로 삭제 된다
- 20 번 부서 삭제 시도시
Controller 클래스 DeptController.java 에서 "deptDelete.do" 요청 부분만
	// 부서 삭제
	@RequestMapping("deptDelete.do")
	public String deptDelete(int deptno, Model model) {
		int result = ds.delete(deptno);
		model.addAttribute("result", result);
		return "deptDelete";
	}
- 앞에서 넘어온 네임값과 이름이 같은 변수 deptno 에 앞에서 넘어온 부서코드가 바로 저장됨
- @RequestParam("deptno") 가 int deptno 앞에 생략되어있다
<돌아온 후>
- 삭제가 성공적으로 완료되었다면 delete() 메소드는 1 을 리턴함, 그 값을 result 변수에 저장
- result 변수를 Model 객체에 저장하고 deptDelete.jsp 로 이동
Service 클래스 DeptServiceImpl.java 에서 delete() 메소드 부분만
	public int delete(int deptno) {
		return dd.delete(deptno);
	}
DAO 클래스 DeptDaoImpl.java 에서 delete() 메소드 부분만
	public int delete(int deptno) {
		return st.delete("deptns.delete", deptno);
	}
- delete() 수행 후 DB 에서 수정을 성공하면, delete() 는 1 을 자동으로 리턴한다 삭제한 데이터 개수)
- Mapper 파일의 SQL문을 가져오는 것이고, 실제 SQL문의 실행은 여기 DAO의 delete() 문이 실행한다
- 그 1 을 다시 Service 로 리턴함
Mapper 파일 Dept.xml 에서 id 가 "delete" 인 태그 부분만
	<delete id="delete" parameterType="int">
		delete from dept where deptno=#{deptno}
	</delete>
- 넘어온 값은 부서코드이다, #{deptno} 로 사용함
- 해당 부서코드를 가진 부서를 dept 테이블에서 삭제
View 페이지 deptDelete.jsp
- deptDelete.jsp
<%@ page language="java" contentType="text/html; charset=UTF-8"
	pageEncoding="UTF-8"%>
<%@ include file="header.jsp"%>

<!DOCTYPE html>
<html>
<head>
<meta charset="UTF-8">
<title>Insert title here</title>
</head>
<body>
	<c:if test="${result > 0 }">
		<script type="text/javascript">
			alert("삭제 성공");
			location.href = "deptList.do";
		</script>
	</c:if>
	<c:if test="${result <= 0 }">
		<script type="text/javascript">
			alert("삭제 실패");
			location.href = "deptList.do";
		</script>
	</c:if>
</body>
</html>
- "result" 를 통해 삭제 성공 / 실패 처리를 한다
- 삭제 성공시 result 가 1 이므로, "삭제 성공" 을 출력하고, 목록 페이지로 가기 위해 deptList.do 로 요청
- 삭제 실패시 result 가 <=0 이므로 "삭제 실패" 를 출력하고, 목록 페이지로 가기 위해 deptList.do 로 요청
+ 목록 페이지에서 "삭제" 를 눌렀으므로 삭제 실패 후 돌아가는 것도 목록 페이지로 했다
- 참조하는 직원이 없는 50 번 부서를 삭제해보자


- 참조하는 직원(자식) 이 없으므로 지워짐
+ 삭제 후 다시 50번 부서를 등록하자(실습 위해)
문제
삭제시 주의 (중복)
- Emp 테이블과 Dept 테이블은 참조관계가 있다
- 현재 내가 입력한 50번 부서는 참조하는 Foreign Key 가 없으므로 부서 삭제가 된다
- 10,20,30 번 부서는 참조하는 Foreign Key 가 있으므로 삭제되지 않는다
- 10,20,30 번 부서는 사원 테이블 Emp 에서 참조한다
+ 40번 부서는 원래 참조하는 사원이 없으므로 삭제 된다
- 20 번 부서 삭제 시도시
문제 해결 방법
참조하는 자식이 있는 부모도 무조건 삭제하려면?
- 테이블 생성 또는 수정(Alert) 시에 On Delete Cascade 를 써야 한다
- 그럼 부서를 삭제할때 그 부서 소속 직원들 또한 연쇄적으로 삭제된다.
프로젝트 MyBatis2 : 부서 상세 페이지 (해당 부서의 직원들 목록)
- deptList.jsp 에서 부서명을 출력하는 코드에 링크가 걸려있다
<td><a href="empList.do?deptno=${dept.deptno}"
		 class="btn btn-info">${dept.dname}</a></td>
- 부서명 을 클릭시 "empList.do" 로 요청하고, 이때 그 부서 소속 직원을 구해와야 하므로 부서코드 deptno 를 가져간다
ex) 20 번 부서 부서명 클릭시 20 번 부서에 속하는 직원들을 select SQL문으로 구해와야한다
- 부서코드 deptno 를 통해 Emp 테이블에서 검색을 해야한다
Controller 클래스 EmpController.java 에서 "empList.do" 요청 부분만 + @Autowired 부분
	@Autowired
	private EmpService es;
	@Autowired
	private DeptService ds;

	// 부서 상세 페이지
	@RequestMapping("empList.do")
	public String empList(int deptno, Model model) {
		Dept dept = ds.select(deptno);
		List<Emp> list = es.list(deptno);
		model.addAttribute("dept", dept);
		model.addAttribute("list", list);
		return "emp/empList";
	}
- 앞에서 넘어온 네임값과 이름이 같은 변수 deptno 에 앞에서 넘어온 부서코드가 바로 저장됨
- @RequestParam("deptno") 가 int deptno 앞에 생략되어있다
- 상세 페이지에서 2가지 다른 정보를 DB 에서 구해와야하므로, 2개의 Service 객체를 @Autowired 로 구해옴
- Dept 테이블과 연동 위해 DeptService 객체, Emp 테이블과 연동 위해 EmpService 객체 구함
상세 페이지에서 2가지 정보를 구해야한다
1. Dept 테이블에서 부서 상세 정보를 구하기
- 아래에 표시한 부분(부서명) 을 뿌려주기 위해 부서 상세 정보도 구해야함

2. Emp 테이블에서 각 부서 소속 직원들 목록 구하기

<돌아온 후>
- 돌려 받은 부서 상세 정보를 저장한 Dept 객체 dept, 검색한 사원 정보들을 저장한 List 를 모두 Model 객체에 저장
- 그리고 /WEB-INF/views/emp/empList.jsp 로 이동
1. Dept 테이블에서 부서 상세 정보를 구하기
- select 는 많이 했으므로 코드 생략
2. Emp 테이블에서 각 부서 소속 직원들 목록 구하기
Service 클래스 EmpServiceImpl.java 에서 list() 메소드 부분만
	public List<Emp> list(int deptno) {
		return ed.list(deptno);
	}
DAO 클래스 EmpDaoImpl.java 에서 list() 메소드 부분만
	public List<Emp> list(int deptno) {
		return sst.selectList("empns.list", deptno);
	}
- Emp 테이블에서 특정 부서번호의 직원을 구할 것이므로 여러 데이터를 검색하는 것임, selectList() 를 쓴다
Mapper 파일 Emp.xml 에서 id 가 "list" 인 태그 부분만 + resultMap
	<!-- Use type aliases to avoid typing the full classname every time. -->
	<resultMap id="empResult"    	type="emp">
		<result property="empno" 	column="empno" />
		<result property="ename"  	column="ename" />
		<result property="job"		column="job" />
		<result property="mgr" 		column="mgr" />
		<result property="hiredate" column="hiredate" />
		<result property="sal"	  	column="sal" />
		<result property="comm"	   	column="comm" />
		<result property="deptno"   column="deptno" />
		<result property="dname"	column="dname" />
		<result property="loc"   	column="loc" />
	</resultMap>
<select id="list" parameterType="int" resultMap="empResult">
select * from emp where deptno=#{deptno} order by empno
</select>- 현재는 꼭 resultMap 을 쓰지 않아도 된다
- Emp 테이블에서 특정 deptno 를 가진 사원들의 데이터를 모두 검색한다
- order by empno 에 의해 사원번호를 기준으로 오름차순 정렬된다
View 페이지 empList.jsp
- emp/empList.jsp
<%@ page language="java" contentType="text/html; charset=UTF-8"
	pageEncoding="UTF-8"%>
<%@ include file="../header.jsp"%>

<!DOCTYPE html>
<html>
<head>
<meta charset="UTF-8">
<title>Insert title here</title>
<script type="text/javascript">
	$(function() {
		$('#list').load('deptList.do');
	});
</script>
</head>
<body>
	<div class="container" align="center">
		<h2 class="text-primary">${dept.dname}직원목록</h2>
		<table class="table table-striped">
			<tr>
				<td>사번</td>
				<td>이름</td>
				<td>업무</td>
				<td>급여</td>
				<td>부서코드</td>
			</tr>
			<tr>
				<c:if test="${empty list }">
					<tr>
						<td colspan="5">직원이 없는 부서입니다</td>
					</tr>
				</c:if>
				<c:if test="${not empty list }">
					<c:forEach var="emp" items="${list }">
						<tr>
							<td>${emp.empno }</td>
							<td><a href="empView.do?empno=${emp.empno}"
								   class="btn btn-info">${emp.ename}</a></td>
							<td>${emp.job}</td>
							<td>${emp.sal}</td>
							<td>${emp.deptno}</td>
						</tr>
					</c:forEach>
				</c:if>
		</table>
		<a href="deptList.do" class="btn btn-success">부서목록</a>
		<a href="empInsertForm.do" class="btn btn-success">직원 입력</a>
		<div id="list"></div>
	</div>
</body>
</html>
- Model 객체에 저장된 해당 부서의 상세 정보 dept 를 사용해서 ${dept.dname} 으로 상단에 부서명을 출력
- Model 객체에 저장된 해당 부서 소속 사원 목록인 list 를 사용해서 ${list} 를 forEach 의 items 에 써서 사원 데이터를 하나씩 가져온다
- forEach의 emp 변수를 통해 하나씩 가져온 사원 데이터에서 ${emp.empno} 등을 활용해 사원 정보를 출력
- 부서 상세페이지에 출력된 사원 정보에서 사원명을 클릭하면 해당 사원의 상세정보를 보여주기 위해 "empView.do" 로 요청한다

- 부서 상세페이지에서 "직원 입력" 을 누르면 직원을 새로 등록할 수 있는 직원 입력폼으로 가기 위해 "empInsertForm.do" 로 요청한다

아래에 부서 목록 뿌리기 (비동기 처리) (empList.jsp 부분)
- 부서 상세 페이지 하단에도 목록 페이지와 같은 부서 목록을 출력하고 있다

<script type="text/javascript">
	$(function() {
		// deptList.do 요청 결과를 div 태그 사이에 출력
		$('#list').load('deptList.do');
	});
</script>
- id 가 "list"인 div 태그를 구해와서 ajax 의 load() 함수를 사용해서 "deptList.do" 요청 결과 전체를 그 div 태그 사이에 출력
+ 이전에도 비슷한 내용을 했다 : https://laker99.tistory.com/146
(검색어 : 아래에 목록 출력하기 (비동기 처리) (deptView.jsp 부분))
- 소속 직원이 없는 부서인 50번 부서 상세 페이지

- 참조하는 직원이 없는 부서이므로 삭제 가능하다
- 소속 직원이 있는 20번 부서의 상세 페이지
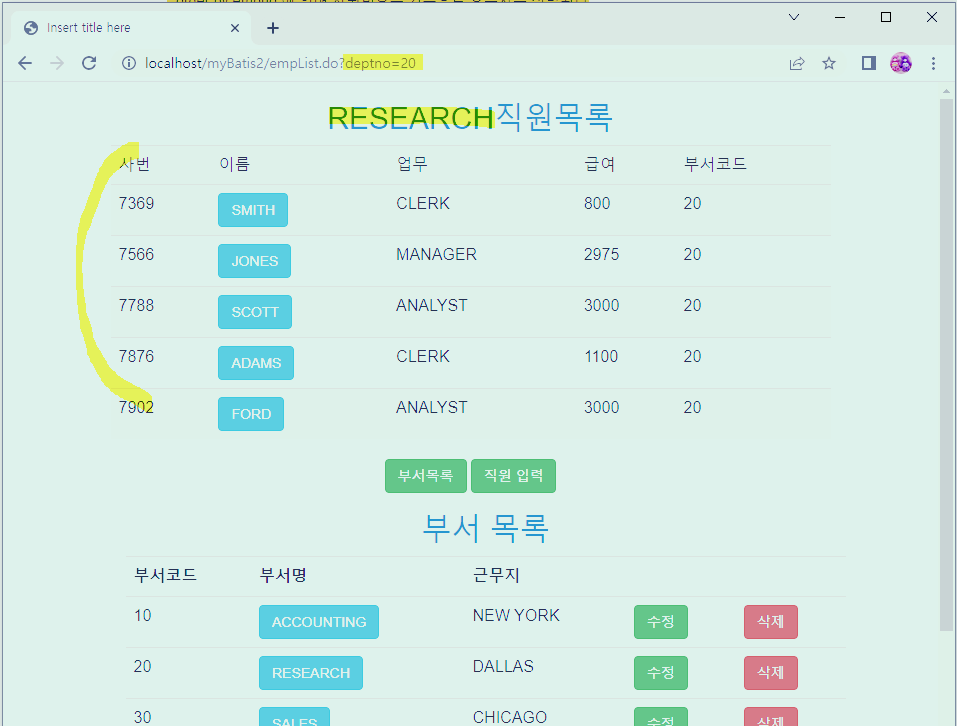
- 사원을 출력할때 사번이 빠른 순서대로 출력된다(오름차순)
프로젝트 MyBatis2 : 사원 등록폼
- 사원 등록 전 사원 등록폼 부터 가야한다
- 부서 상세페이지에서 "직원 입력" 을 누르면 사원을 새로 등록할 수 있는 사원 입력폼으로 가기 위해 "empInsertForm.do" 로 요청한다
<a href="empInsertForm.do" class="btn btn-success">직원 입력</a>- "직원 입력" 클릭시 "empInsertForm.do" 로 요청
직원 등록폼에서 DB 와 연동해서 할 일
- 직원 입력폼에서 직원을 등록할때 관리자, 부서코드를 가져와야함
- 사원, 부서는 추가할 수 있으므로 고정된 리스트가 아님, 그래서 DB 와 연동해서 가져와야함
- 즉 사원 목록, 부서 목록을 가져와서 이 직원 입력폼에 뿌려야한다

Controller 클래스 EmpController.java 에서 "empInsertForm.do" 요청 부분만
	@RequestMapping("empInsertForm.do")
	public String empInsertForm(Model model) {
		List<Dept> deptList = ds.list();
		List<Emp> empList = es.empList();
		model.addAttribute("deptList", deptList);
		model.addAttribute("empList", empList);
		return "emp/empInsertForm";
	}
- 사원을 새로 등록할때 사번이 중복되지 않은지 중복검사를 해야함
DB 에서 가져와야 할 것 2가지
1. 사원 목록
- 관리자를 선택할때 관리자의 사원명은 바뀔 수 있는 값(사원이 추가될 수도 있다) 이므로, 사원명 리스트를 DB 와 연동해서 가져와야함
2. 부서 목록
- 부서명을 선택할때 부서명은 바뀔 수 있는 값(부서가 추가될 수도 있다)이므로, 부서명 리스트를 DB 와 연동해서 가져와야함
- 사원, 부서는 추가될 수 있으므로 DB와 연동해서 그 리스트를 가져와야함
- 즉 부서명, 사원명 을 가져오기 위해 Dept 테이블, Emp 테이블 둘 다 연동해서 부서 목록, 사원 목록 을 가져와야함
- 부서 목록 가져오기는 위에서 했으므로 코드 생략
- 사원 목록 가져오기는 위에서 한것과 유사하므로 코드 생략
- 특정 부서의 사원이 아니라 전체 사원을 구한다는 점만 다르다
<돌아온 후>
- 사원 전체 목록, 부서 전체 목록을 모두 Model 객체에 저장 후 empInsertForm.jsp 로 이동
- View 페이지인 사원 등록 폼으로 가자
View 페이지 empInsert.jsp
- emp/empInsert.jsp
<%@ page language="java" contentType="text/html; charset=UTF-8"
pageEncoding="UTF-8"%>
<%@ include file="../header.jsp"%>
<!DOCTYPE html>
<html>
<head>
<meta charset="UTF-8">
<title>Insert title here</title>
<script type="text/javascript">
$(function() {
// 사원번호 중복검사
$('#dupCheck').click(function() {
var empno = $('#empno').val();
if (!empno) {
alert('사번 입력후에 체크');
$('#empno').focus();
return false;
}// $.post("요청이름","전달될 값","콜백함수");
$.post('dupCheck.do', 'empno=' + empno, function(msg) {
alert(msg);
});
});
});
</script>
</head>
<body>
<div class="container">
<h2 class="text-primary">직원 등록</h2>
<form action="empInsert.do" method="post">
<table class="table table-bordered">
<tr>
<td>사번</td>
<td><input type="number" name="empno" required="required"
id="empno" autofocus="autofocus">
<input type="button" value="중복" id="dupCheck"></td>
</tr>
<tr>
<td>이름</td>
<td><input type="text" name="ename" required="required"></td>
</tr>
<tr>
<td>업무</td>
<td><input type="text" name="job" required="required"></td>
</tr>
<tr>
<td>관리자</td>
<td><select name="mgr">
<c:forEach var="emp" items="${empList }">
<option value="${emp.empno}">${emp.ename}</option>
</c:forEach>
</select>
</td>
</tr>
<tr>
<td>입사일</td>
<td><input type="date" name="hiredate" required="required"></td>
</tr>
<tr>
<td>급여</td>
<td><input type="number" name="sal" required="required"></td>
</tr>
<tr>
<td>보너스</td>
<td><input type="number" name="comm" required="required"></td>
</tr>
<tr>
<td>부서코드</td>
<td><select name="deptno">
<c:forEach var="dept" items="${deptList }">
<option value="${dept.deptno}">${dept.dname}</option>
</c:forEach>
</select>
</td>
</tr>
<tr>
<td colspan="2"><input type="submit" value="확인"></td>
</tr>
</table>
</form>
</div>
</body>
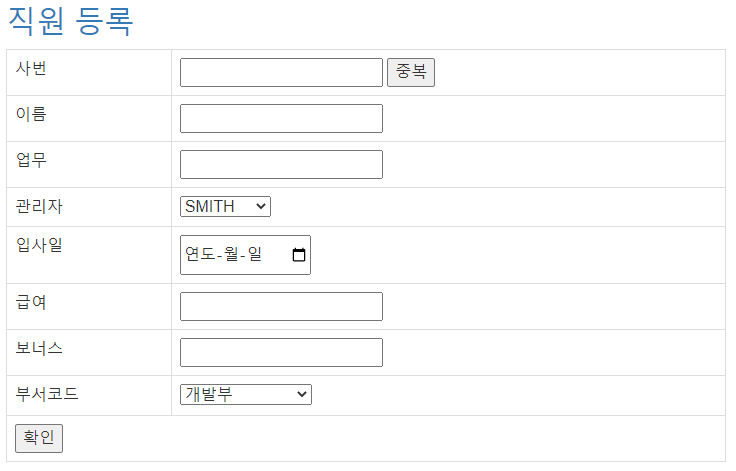
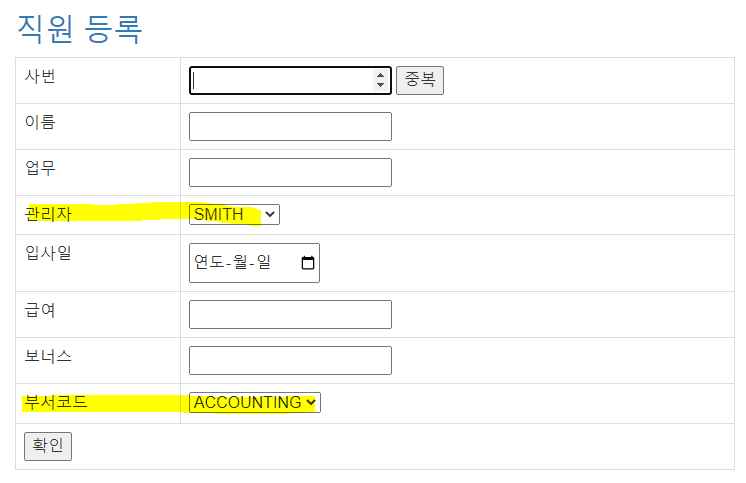
</html>- 가져온 사원, 부서 목록 forEach 태그의 items 태그에 ${empList} , ${deptList} 에 넣는다
- 그 forEach 태그에서 사원 1명 정보를 담은 객체를 가져와서, select 태그 안의 option 에 필요한 필드를 가져와서 뿌리기
- 그 forEach 태그에서 부서 1개 정보를 담은 객체를 가져와서, select 태그 안의 option 에 필요한 필드를 가져와서 뿌리기
<관리자>
- 가져온 관리자 목록에서 관리자를 1명씩 가져와서 그 관리자의 사원명, 사원번호를 꺼낸다
- 관리자를 선택할때, 사원명이 출력되지만 value 는 관리자(상사) 의 사원번호인 empno 이다
- 즉 실제 DB 에 저장되는 값은 관리자의 사원명이 아닌 관리자의 사원번호이다!
<입사일>
- input type 을 "date" 로만 해도 캘린더를 선택할 수 있는 양식이 나타남
<부서>
- 부서를 선택할때, 부서명이 출력되지만 value 는 부서의 부서번호은 deptno 이다
- 즉 실제 DB 에 저장되는 값은 부서의 부서명이 아닌 부서의 부서번호이다!
<"확인" 누른 후>
- 직원 입력폼 empInsertForm.jsp 에서 입력을 한 후 "확인" 을 누르면 "empInsert.do" 로 요청한다
- 이때 이 입력폼에 입력된 값들을 가지고 간다
프로젝트 myBatis2 : 사원 등록폼에서 사번 중복검사 (비동기 처리)
사원 번호 중복 검사 (empInsertForm.jsp 부분)
<script type="text/javascript">
	$(function() {
		// 사원번호 중복검사
		$('#dupCheck').click(function() {
			var empno = $('#empno').val();
			if (!empno) {
				alert('사번 입력후에 체크');
				$('#empno').focus();
				return false;
			}// $.post("요청이름","전달될 값","콜백함수");
			$.post('dupCheck.do', 'empno=' + empno, function(msg) {
				alert(msg);
			});
		});
	});
</script>
- DB 에서 이 사번이 사용가능한지 중복검사를 해야함, 이때 이걸 비동기로 처리하려고 한다
- "중복" 버튼 클릭시 click() 함수 실행됨, 사용자가 입력한 값을 구해오고 그 값이 null 인지 유효성 검사
- 입력 값이 있다면 ajax 기능을 사용해서 post() 함수로 사번 중복검사를 한다
+ 비동기 처리 : 페이지가 바뀌지 않고 처리
- 요청 이름값은 "dupCheck.do" 로 한다, 그리고 사용자가 입력한 사번 값을 키 밸류 형식(키=밸류) 으로 전달하며 요청
- 콜백함수로 메세지를 돌려받아서 alert 에 출력
ajax post() 함수에 대한 자세한 내용
https://laker99.tistory.com/106 (검색어 : $.post() 함수)
Controller 클래스 EmpController.java 에서 "dubCheck.do" 요청 부분만
	// 사원번호 중복검사
	@RequestMapping("dupCheck.do")
	public String dupCheck(int empno, Model model) {
		System.out.println("empno:"+empno);
		Emp emp = es.select(empno);
		String msg = "";
		if (emp != null) // 중복 사원번호
			msg = "이미 있는 데이터입니다";
		else // 사용 가능한 사원번호
			msg = "사용 가능한 사번 입니다";
		model.addAttribute("msg", msg);

		// 웹 브라우저에 출력되는 결과가 callback 함수로 리턴된다.
		return "emp/dupCheck";
	}
- 앞에서 키 밸류 형식으로 전달된 사번이, 키값과 같은 이름인 empno 변수로 바로 저장된다
- @RequestParam("empno") 가 int empno 앞에 생략되었다
- 아래에서 empno 를 출력해보면 사용자가 입력한 사번이 출력됨
- 그 empno 로 Service 클래스의 select() 를 호출해서 상세 정보를 구해와서 Emp 객체 emp 에 저장
- 만약 이 emp 가 null 이 아니면, 즉 데이터가 존재하면 해당 사번에 해당하는 데이터가 있다는 의미, 즉 중복인 사원번호라는 의미이다
- 사원번호가 중복이면 "이미 있는 데이터입니다", 중복이 아니면 "사용 가능한 사번입니다" 를 msg 변수에 저장
- 브라우저에 출력되는 값이 콜백함수로 리턴되기때문에 출력을 하는 View 페이지로 msg 를 넘겨서 거기서 브라우저 출력을 하자, 그럼 거기서 출력되는 값이 콜백함수로 리턴됨
+ 여기서 out 객체를 생성해서 출력하면 코드가 지저분해짐, msg 출력만을 하기 위한 View 페이지 dubCheck.jsp 를 따로 만든다
VIew 페이지 dubCheck.jsp
- dubCheck.jsp
${msg}- 메세지가 브라우저에 출력되므로 그 결과가 콜백함수로 리턴된다
- 다시 empInsertForm.jsp 부분을 보자
<script type="text/javascript">
	$(function() {
		// 사원번호 중복검사
		$('#dupCheck').click(function() {
			var empno = $('#empno').val();
			if (!empno) {
				alert('사번 입력후에 체크');
				$('#empno').focus();
				return false;
			}// $.post("요청이름","전달될 값","콜백함수");
			$.post('dupCheck.do', 'empno=' + empno, function(msg) {
				alert(msg);
			});
		});
	});
</script>
- 콜백함수로 값을 받아서 alert 으로 메세지를 뿌려준다
- 그럼 중복일떄는 "이미 있는 데이터입니다", 중복이 아닐때는 "사용 가능한 사번입니다" 출력
프로젝트 myBatis2 : 사원 등록
- 사원 입력폼 empInsertForm.jsp 에서 입력을 한 후 "확인" 을 누르면 "empInsert.do" 로 요청한다
Controller 클래스 EmpController.java 에서 "empInsert.do" 요청 부분만
	// 사원 등록
	@RequestMapping("empInsert.do")
//	public String empInsert(Emp emp, String hiredate1, Model model) {
	public String empInsert(Emp emp, Model model) {
//		emp.setHiredate(Date.valueOf(hiredate1)); // String -> Date 형변환
		int result = es.insert(emp);
		model.addAttribute("result", result);
		model.addAttribute("deptno", emp.getDeptno());
		return "emp/empInsert";
	}
- 이전의 사원 등록폼에서 넘어온 값들을 한번에 @ModelAttribute (생략) 을 통해 DTO Emp 객체 emp 에 세팅
- Service 클래스의 insert() 메소드 호출, 호출하며 사원 등록폼에서 넘어온 값을 저장하는 객체 emp 를 넘겨줌
<돌아온 후>
- insert() 가 호출되어 삽입 성공하면 1 을 반환한다, result 에 그 값을 저장하고 Model 객체에 result 를 저장
- View 인 empInsert.jsp 에서는 삽입 성공시에, 그 사원의 부서 소속 모든 사원을 출력하는 부서 상세페이지로 이동할 것임
- 그러므로 삽입된 사원의 부서번호인 deptno 또한 가져가야한다, Model 객체에 저장
- /WEB-INF/views/emp/empInsert.jsp 로 이동
Service 클래스 EmpServiceImpl.java 에서 insert() 메소드 부분만
	public int insert(Emp emp) {
		return ed.insert(emp);
	}
DAO클래스 EmpDaoImpl.java 에서 insert() 메소드 부분만
	public int insert(Emp emp) {
		return sst.insert("empns.insert", emp);
	}
Mapper 파일 Emp.xml 에서 id 가 "insert" 인 태그 부분만
	<insert id="insert" parameterType="emp">
		insert into emp values(#{empno},#{ename},#{job},#{mgr},
			#{hiredate},#{sal},#{comm},#{deptno})
	</insert>
- 객체 emp 를 통해 넘어온 값들을 사용해서 insert 를 해준다
- #{empno} 는 emp.getEmpno() 와 같은 의미
- 입사일(hiredate) 은 캘린더에서 선택한 값이었지만, 객체 emp 에서 입사일은 Date 형으로 저장되어 있다
- Emp DTO 클래스에 Date 형으로 되어있기 때문이다
View 페이지 empInsert.jsp
- emp/empInsert.jsp
<%@ page language="java" contentType="text/html; charset=UTF-8"
	pageEncoding="UTF-8"%>
<%@ include file="../header.jsp"%>

<!DOCTYPE html>
<html>
<head>
<meta charset="UTF-8">
<title>Insert title here</title>
</head>
<body>
	<c:if test="${result > 0 }">
		<script type="text/javascript">
			alert("입력 성공");
			location.href = "empList.do?deptno=${deptno}";
		</script>
	</c:if>
	<c:if test="${result <= 0 }">
		<script type="text/javascript">
			alert("입력 실패");
			history.go(-1);
		</script>
	</c:if>
</body>
</html>
- 삽입 성공시 result 가 1 이므로 "입력 성공" 출력 후 그 사원의 부서 상세 페이지로 이동하기 위해 "empList.do" 로 요청
- 요청하면서, 부서 상세 페이지에서는 해당 부서 소속 모든 사원 목록을 보여주므로 deptno 도 GET 으로 전달한다
- 사원 등록은 아직 하지 않았다
- 내일 등록하자